Month List

For Our Examples we have chosen - high density pure black images as these tend to show pizza wheels more than anything else - windows at the top - Mac at the bottom


Printer Settings paper type and print quality

For our own papers we recommend plain paper high quality setting apart from the Epson L805 which is matte standard -  using the wrong print quality  setting can apply too much ink to the paper and it wont be dry when it hits the rollers.


For Mac it will say Quality - or Fine depending on the model.


These images show  plain paper high quality and matte paper standard quality and the difference in results with regards to pizza wheels, these are printed - scanned - un-sublimated images.


although still present on the plain paper they are much improved and when the pictures is sublimated they may not show on the finished product due to the heat activation of the ink. One thing to bear in mind in changing your print quality setting is the icc Profile will of been built around a particular print quality setting so if you change to something different than what your manufacturer / supplier recommends  - your outputted finished result can be affected..


Printer Settings - Print Speed

Other settings also in your control which you can check and change - is the print speed setting - if high speed printing is selected the ink wont be dry when it hits the rollers  - in this image density / colour there is  only  minor improvement.


settings can be found in the printer properties


For Mac it's in system preferences - printers


Printer Settings - Paper Thickness

Another setting that may effect lines is the paper thickness selection which is only available on some printers 

In windows if available it's in printer properties - extended settings


For Mac it's in system preferences - printers

In sublimation printing, just like learning any new process, there's a tendency to learn the basics and gloss over the finer details in the process. Our basic instructions are as guilty of this as anyone else's - we aim to give you enough instruction to successfully set up your sublimation business, without providing so much information that you feel utterly swamped.


Well, today's an exception to that. Prepare yourselves to learn some information about Photoshop which may never come in handy, and probably won't woo any prospective dates. It may even squeeze some useful information out of your already-crowded brain, so caveat lector.


We'll be taking a look at the difference between the various rendering intents available to you in Photoshop, CorelDRAW, and all the other programmes you might use for your sublimation printing. In our instructions, as mentioned, we tend to ignore this as an option and simply tell customers to select one and not change it.


This is all very well and good for 95% of customers, as it makes no difference in the majority of use cases, but sometimes a customer will have a specific image which doesn't print properly, even though all their other designs are printed without any problems. The problem in many cases is that the image cannot be printed completely accurately by the printer. And this is where your rendering intent comes into play. Depending on which you choose, the image will print differently.


Rendering Intents

Before we get into the differences, though, a bit of background might be necessary. In this first picture, we have a representation of all the colours your eyes can see:
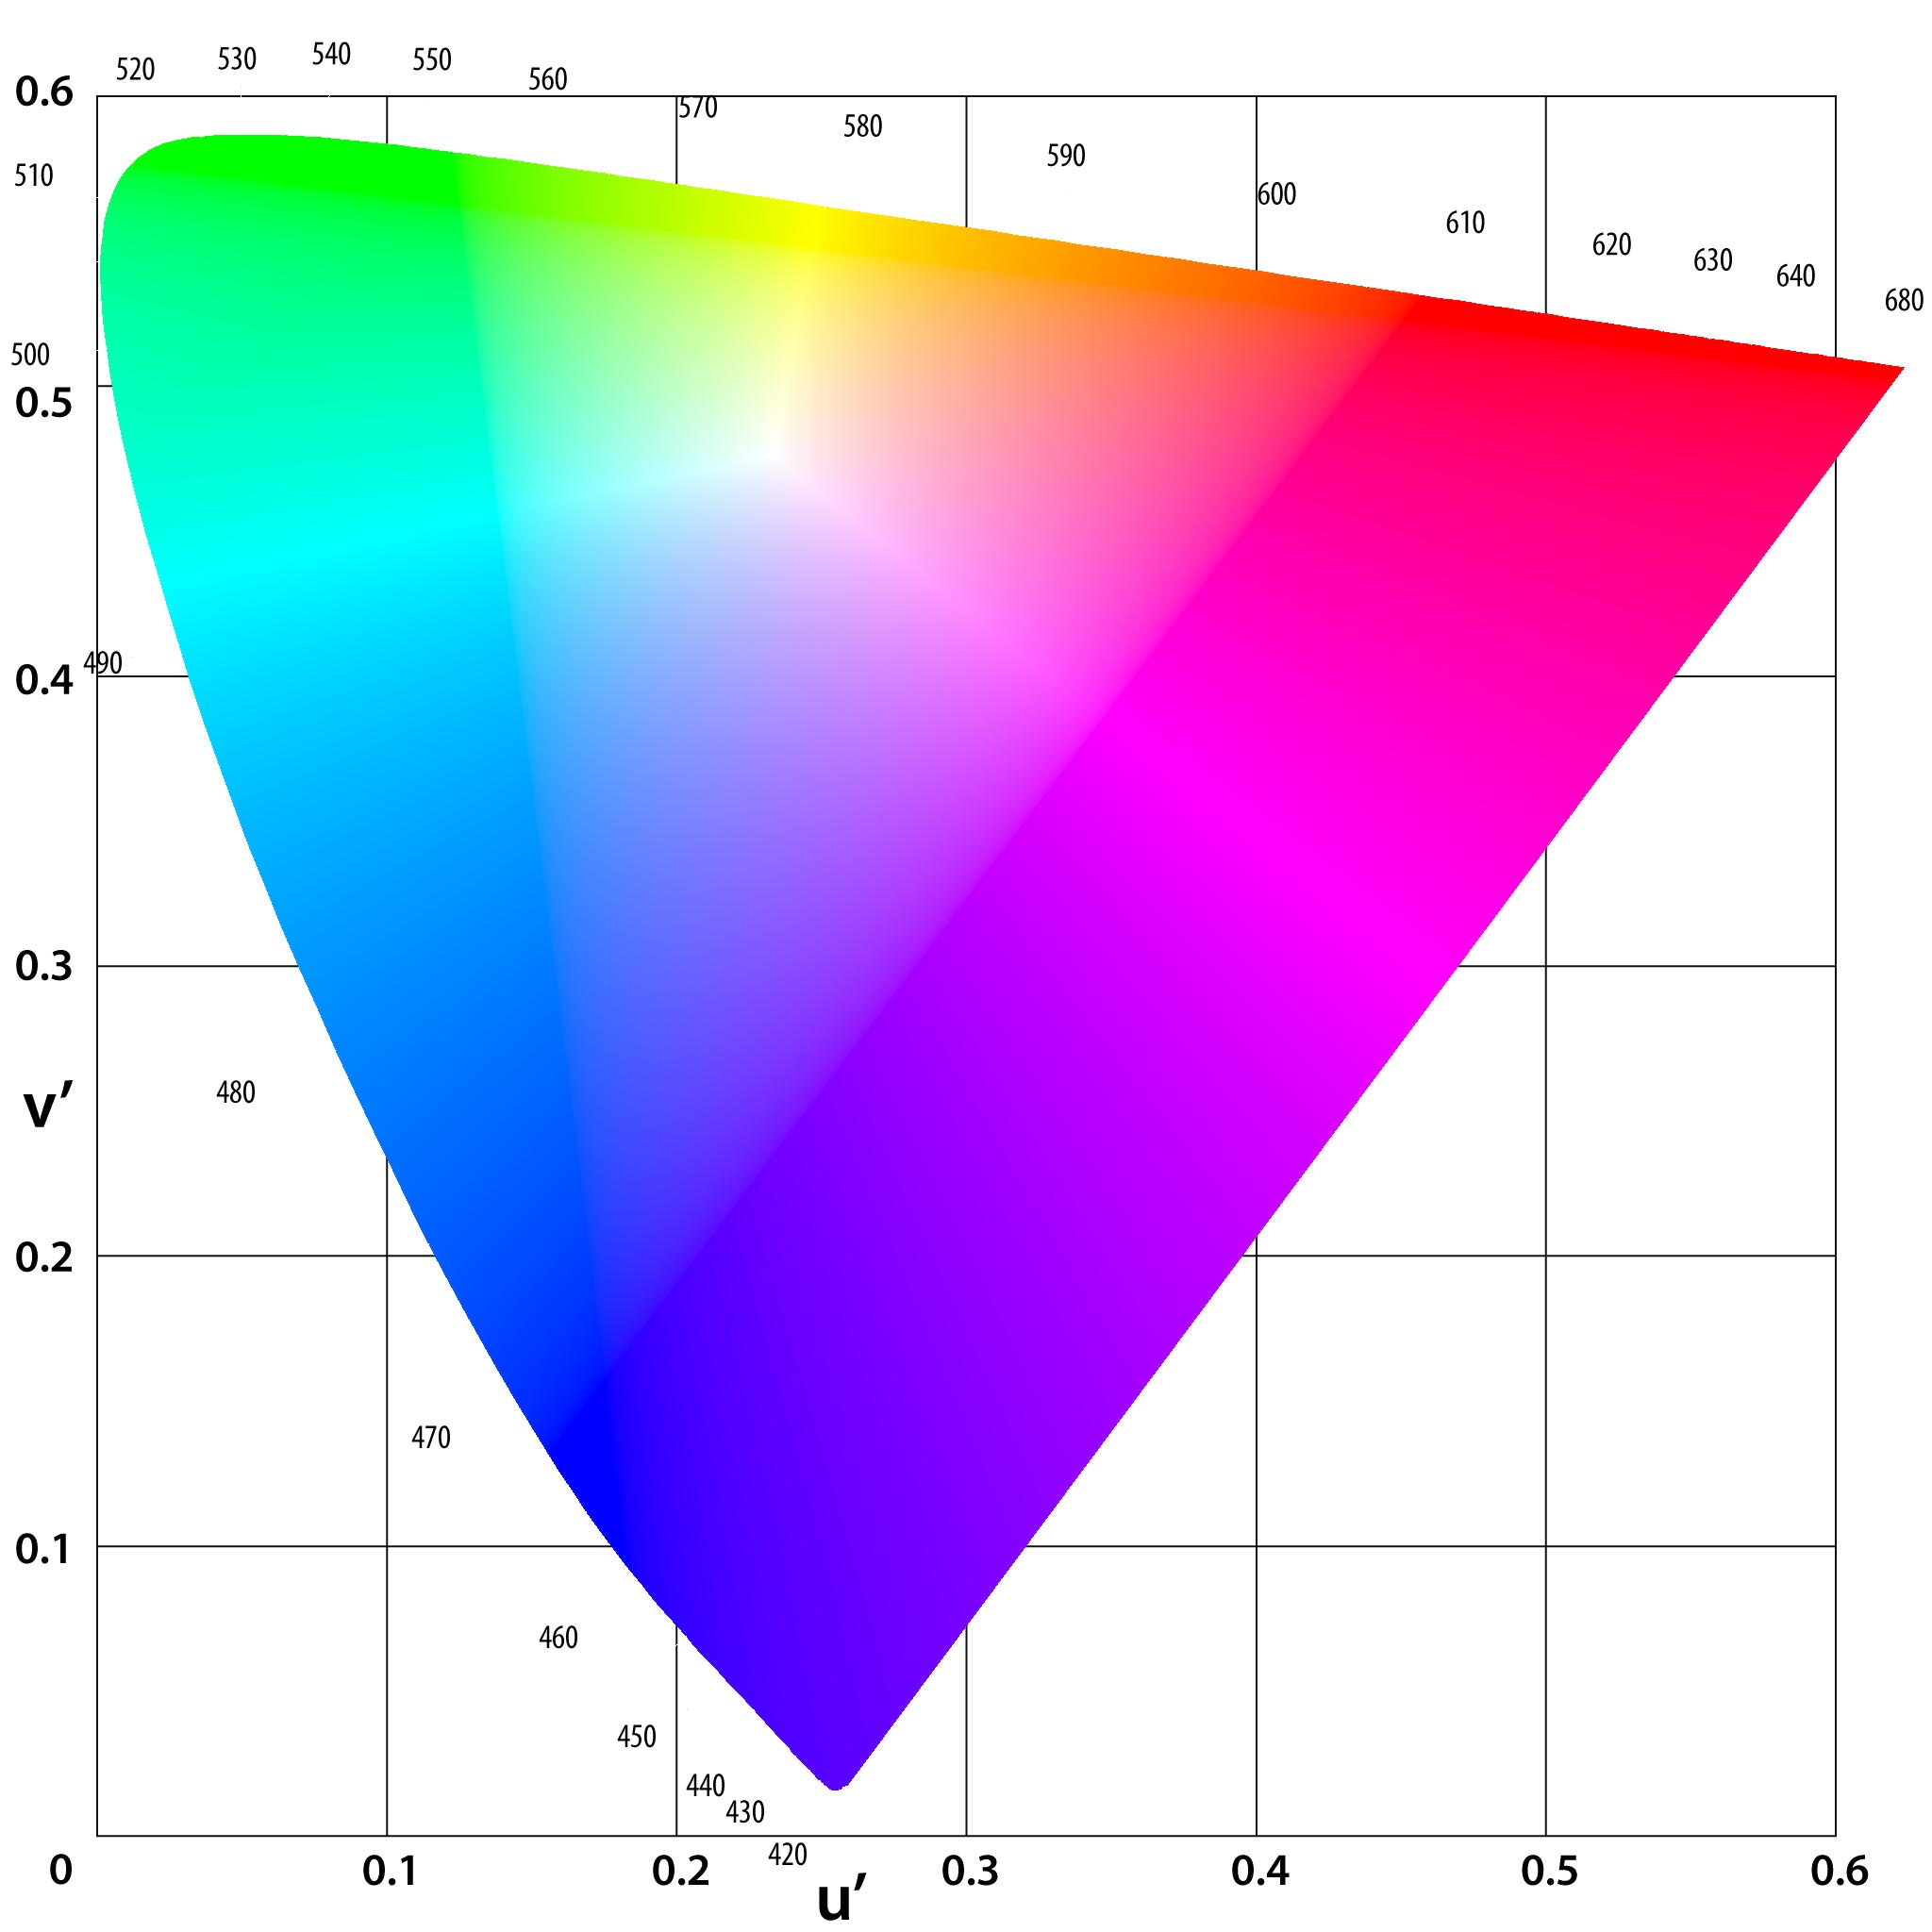

Visible Colours

And within this triangle, all the colours which your computer screen can accurately display:
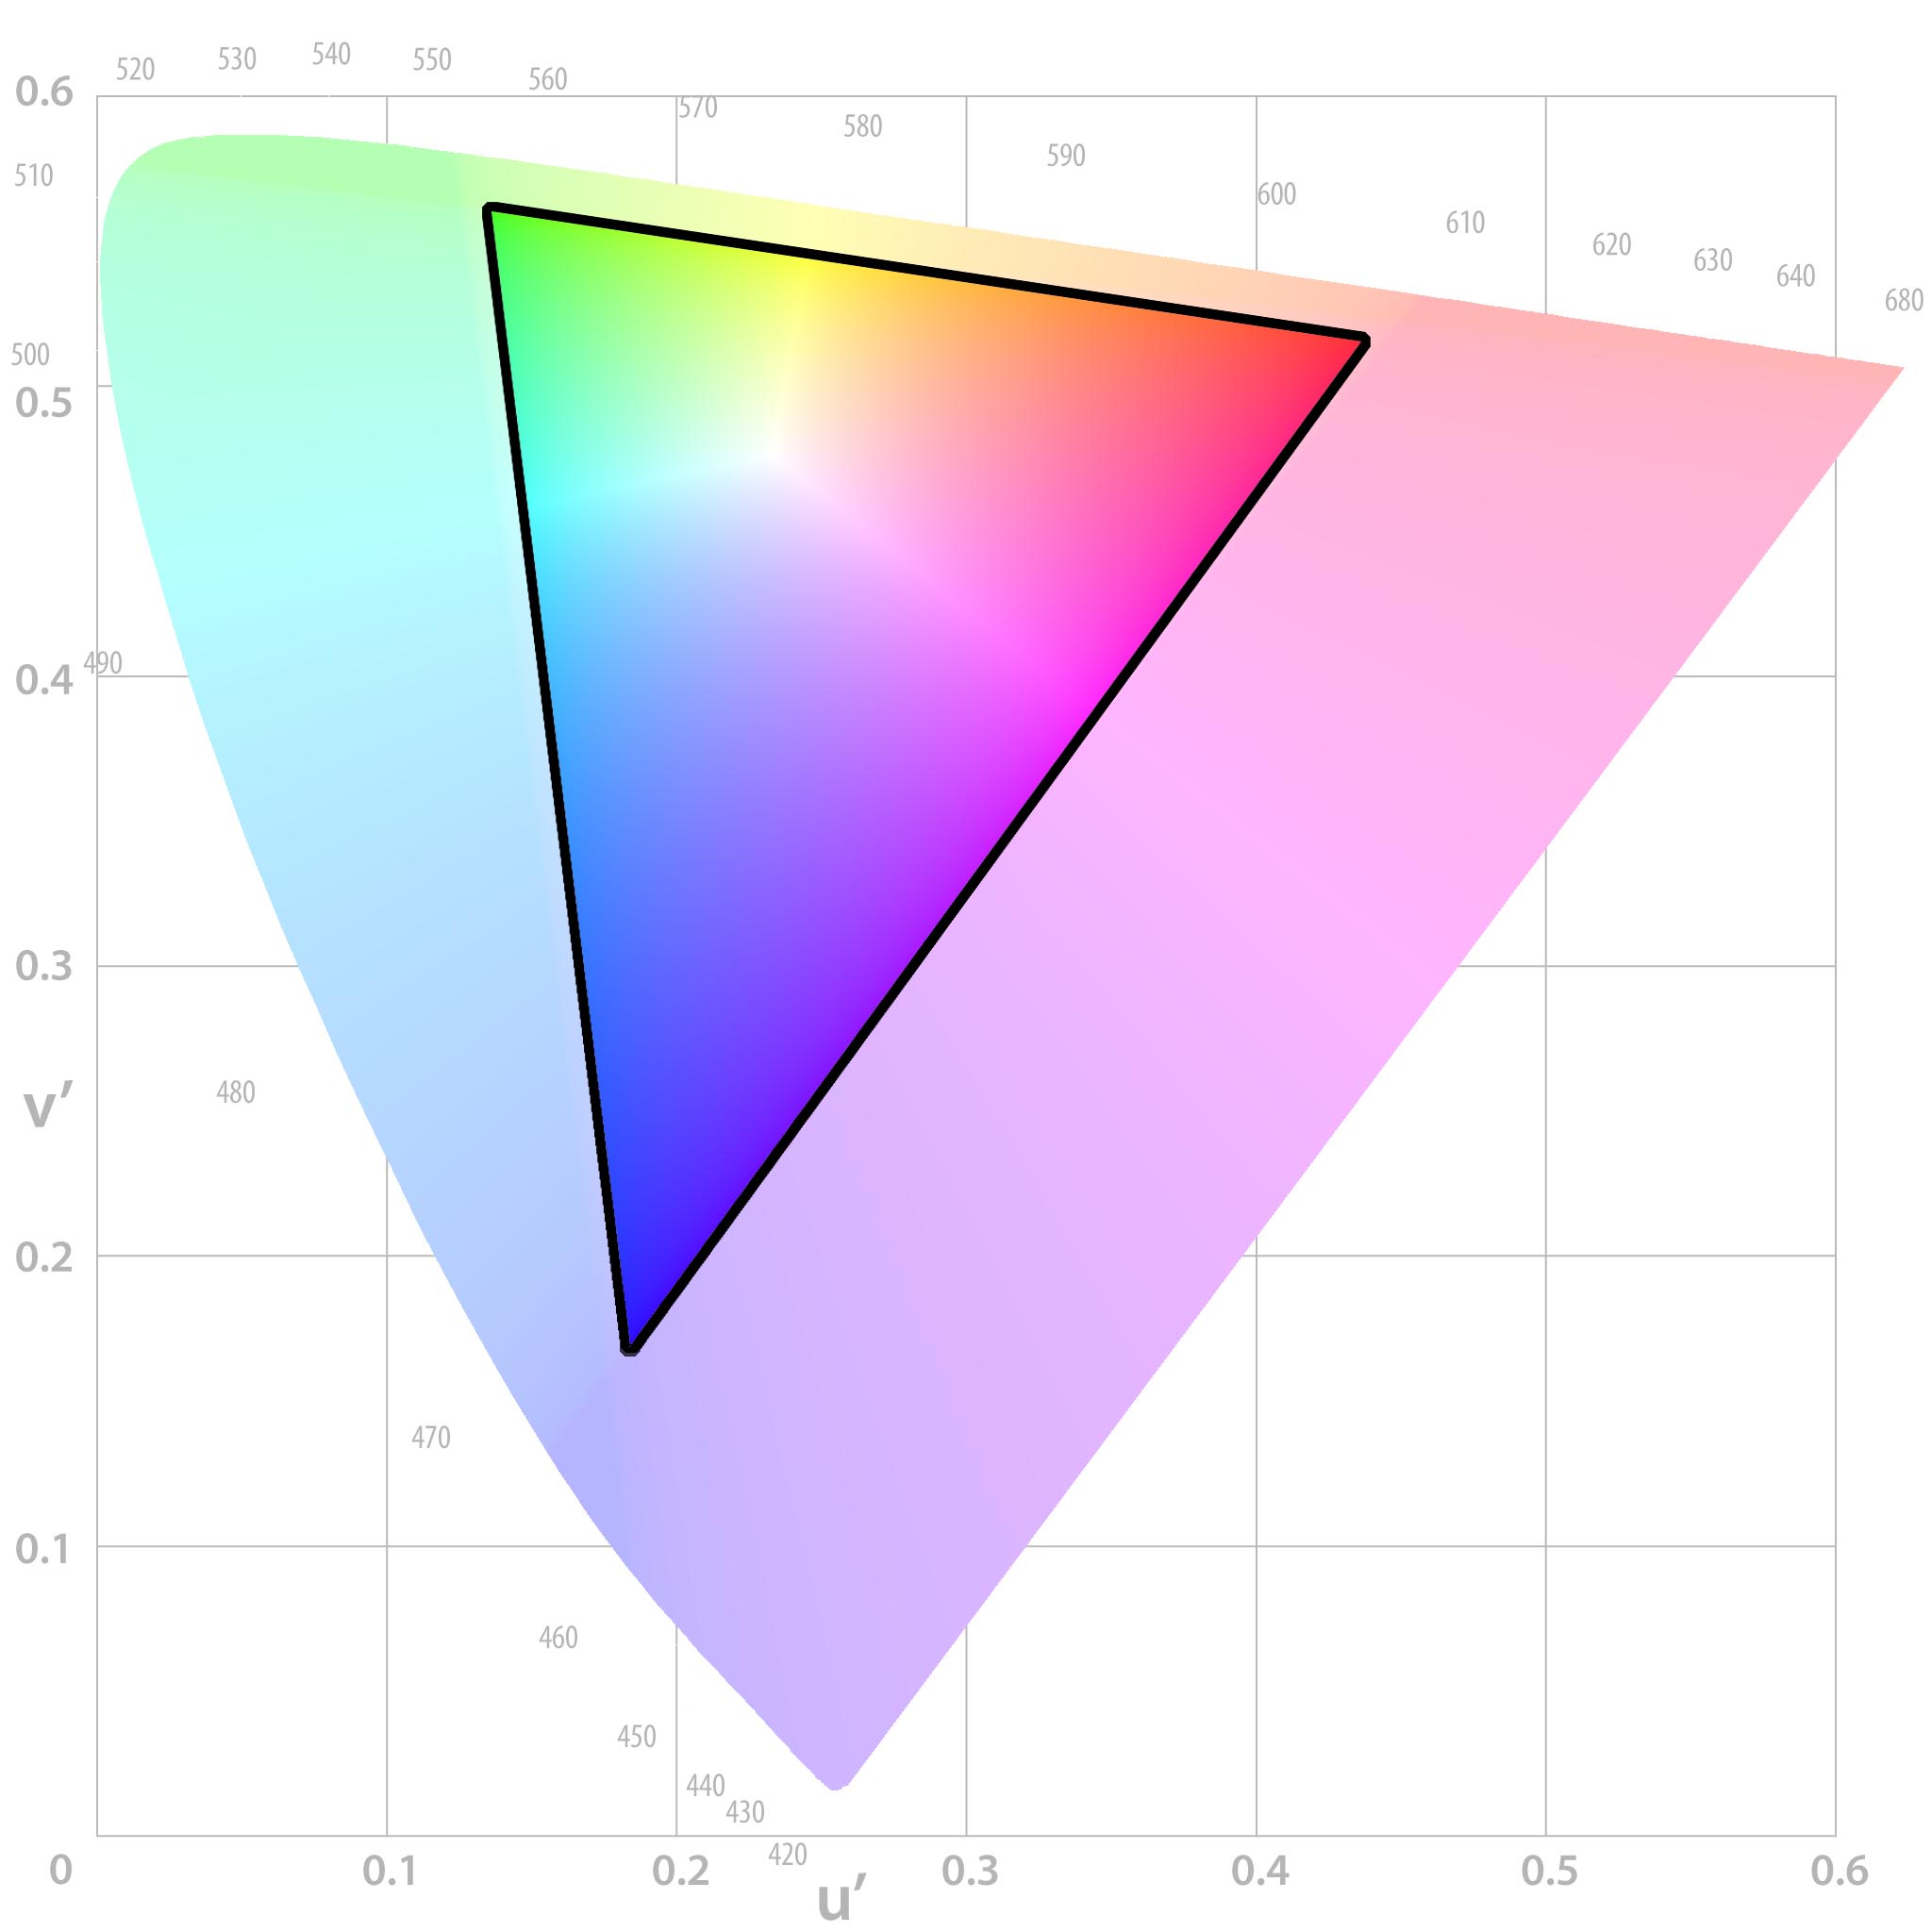

Screen Colours

And now all the colours which a printer might be able to produce (for the purposes of this post, we've based this on a SWOP profile because it's nice and small, and will give us some extreme examples to work with):
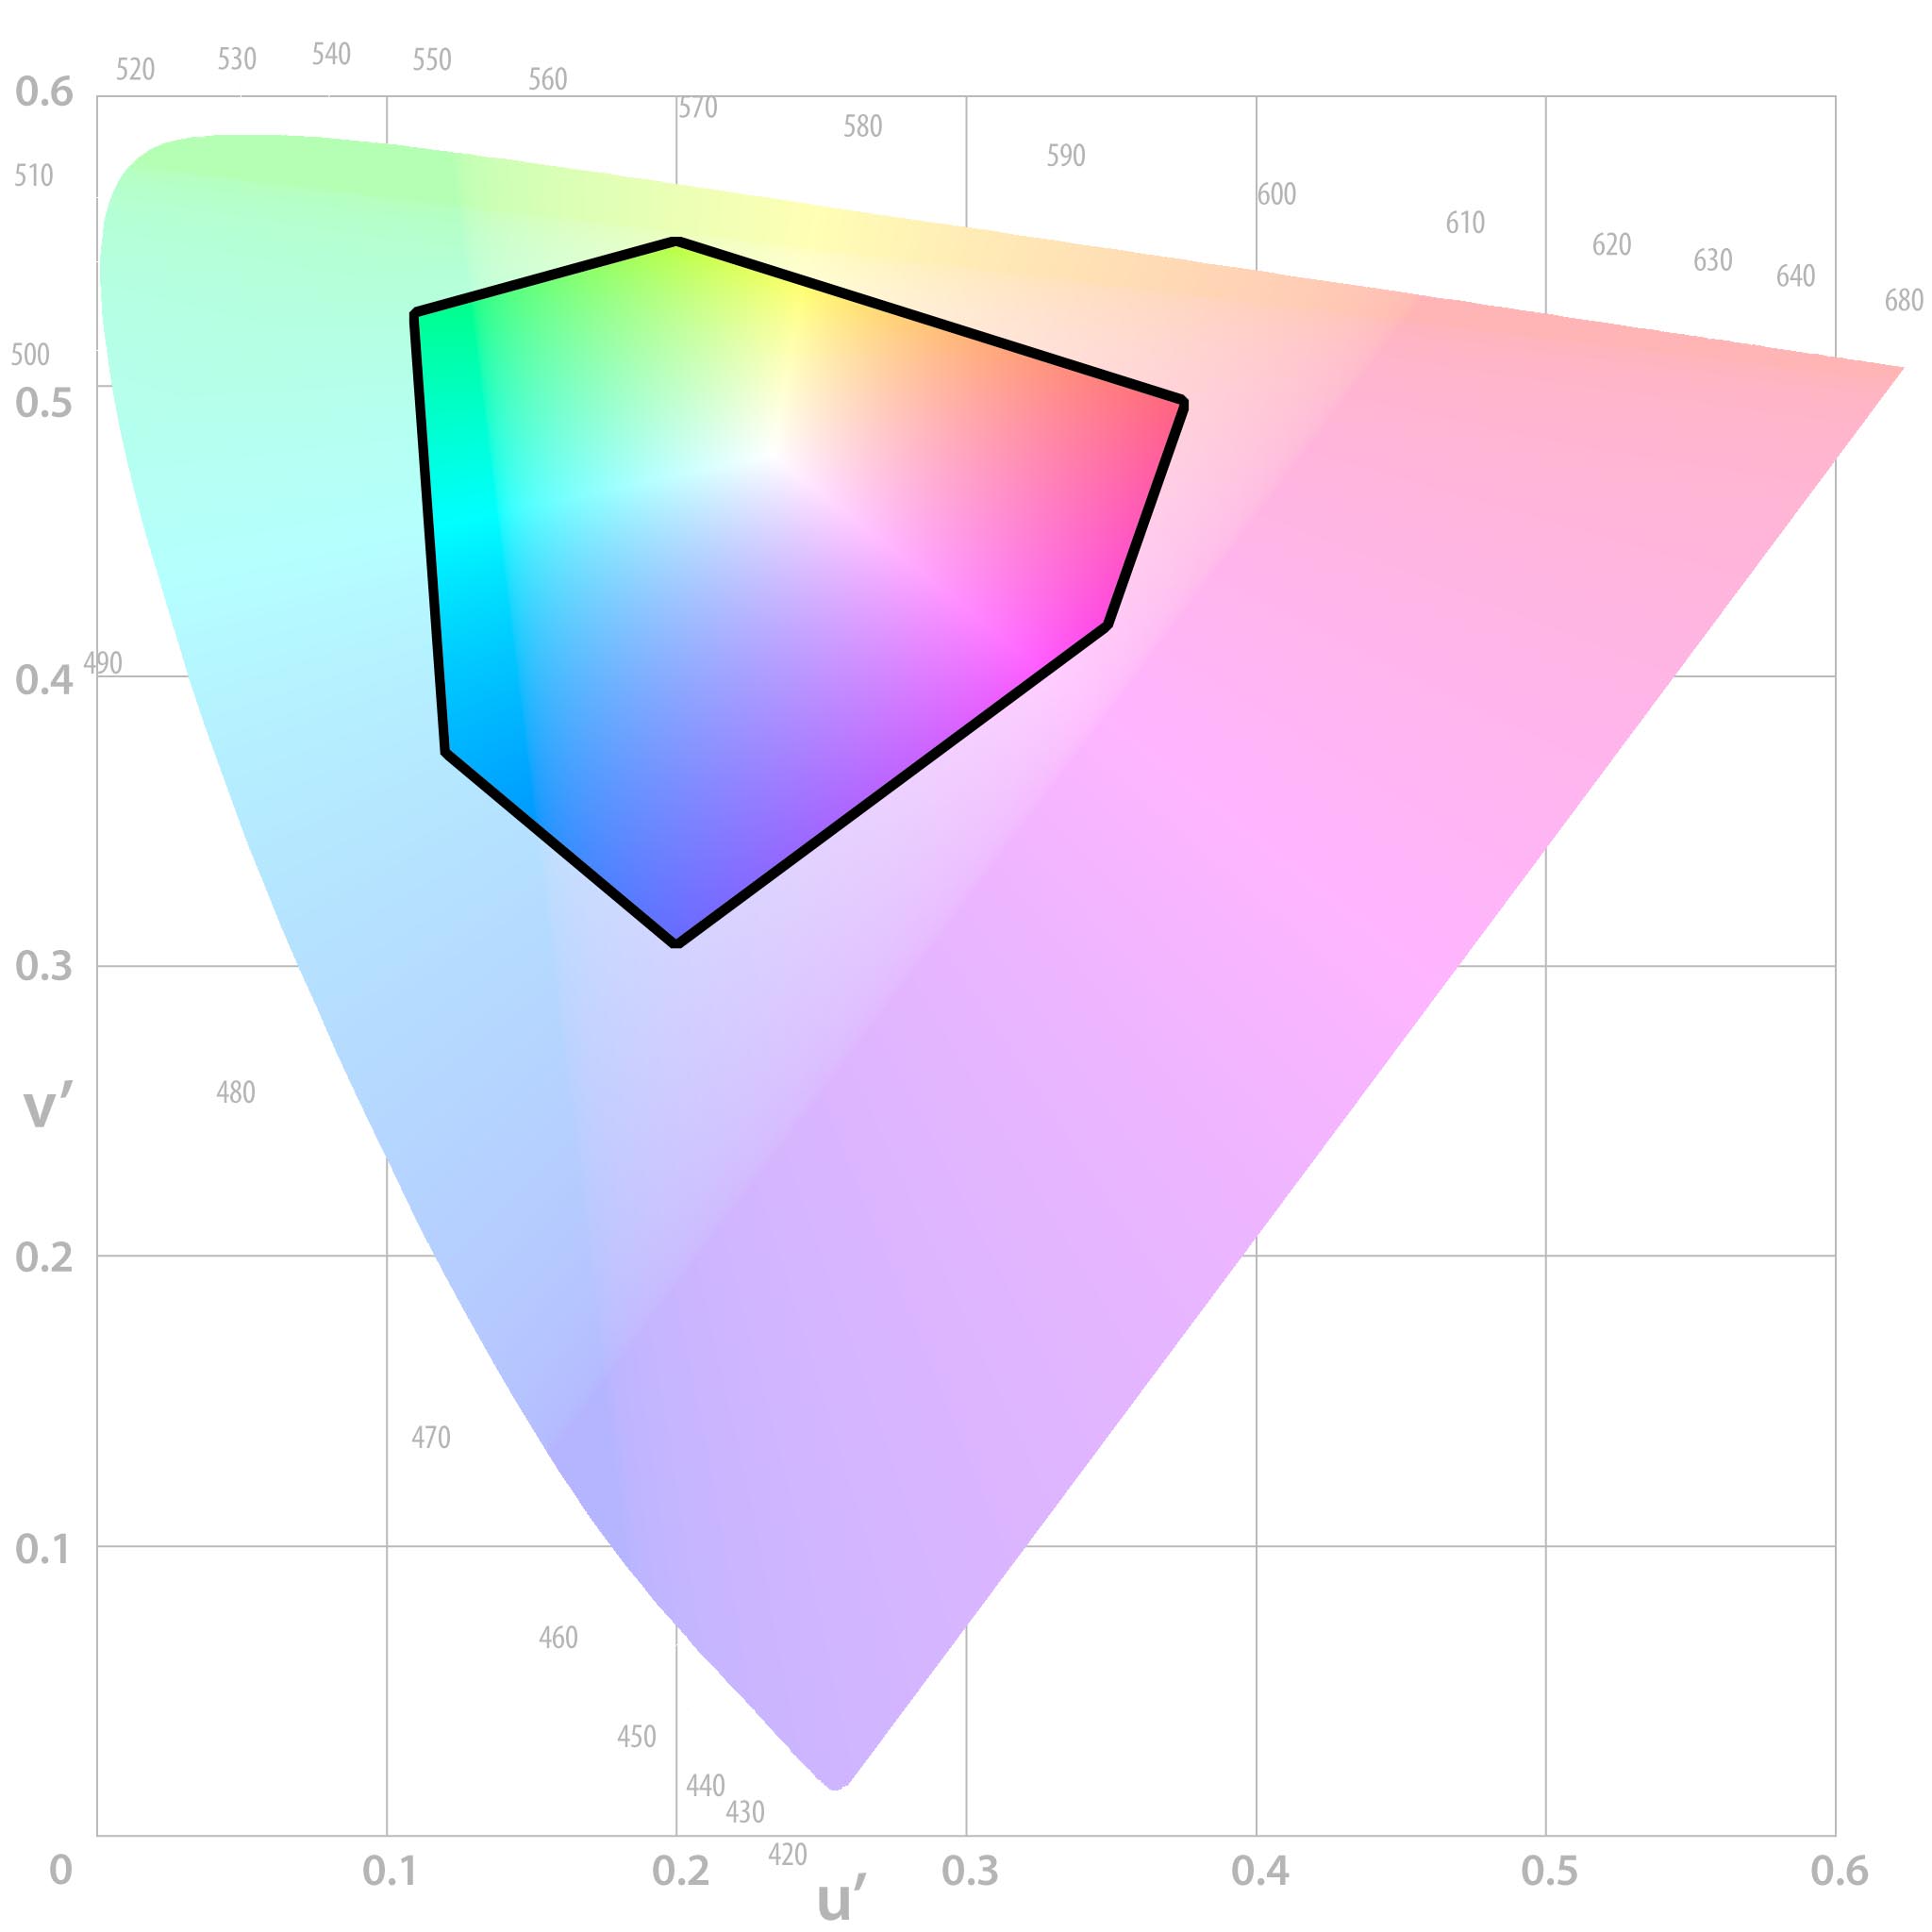

Printable Colours

So, where the screen and printer overlap, colours can be printed accurately. Outside of this area, shown in grey below, are colours which can't be printed 100% accurately, and our ICC profile will have to compensate for this. These colours are known as "out of gamut":
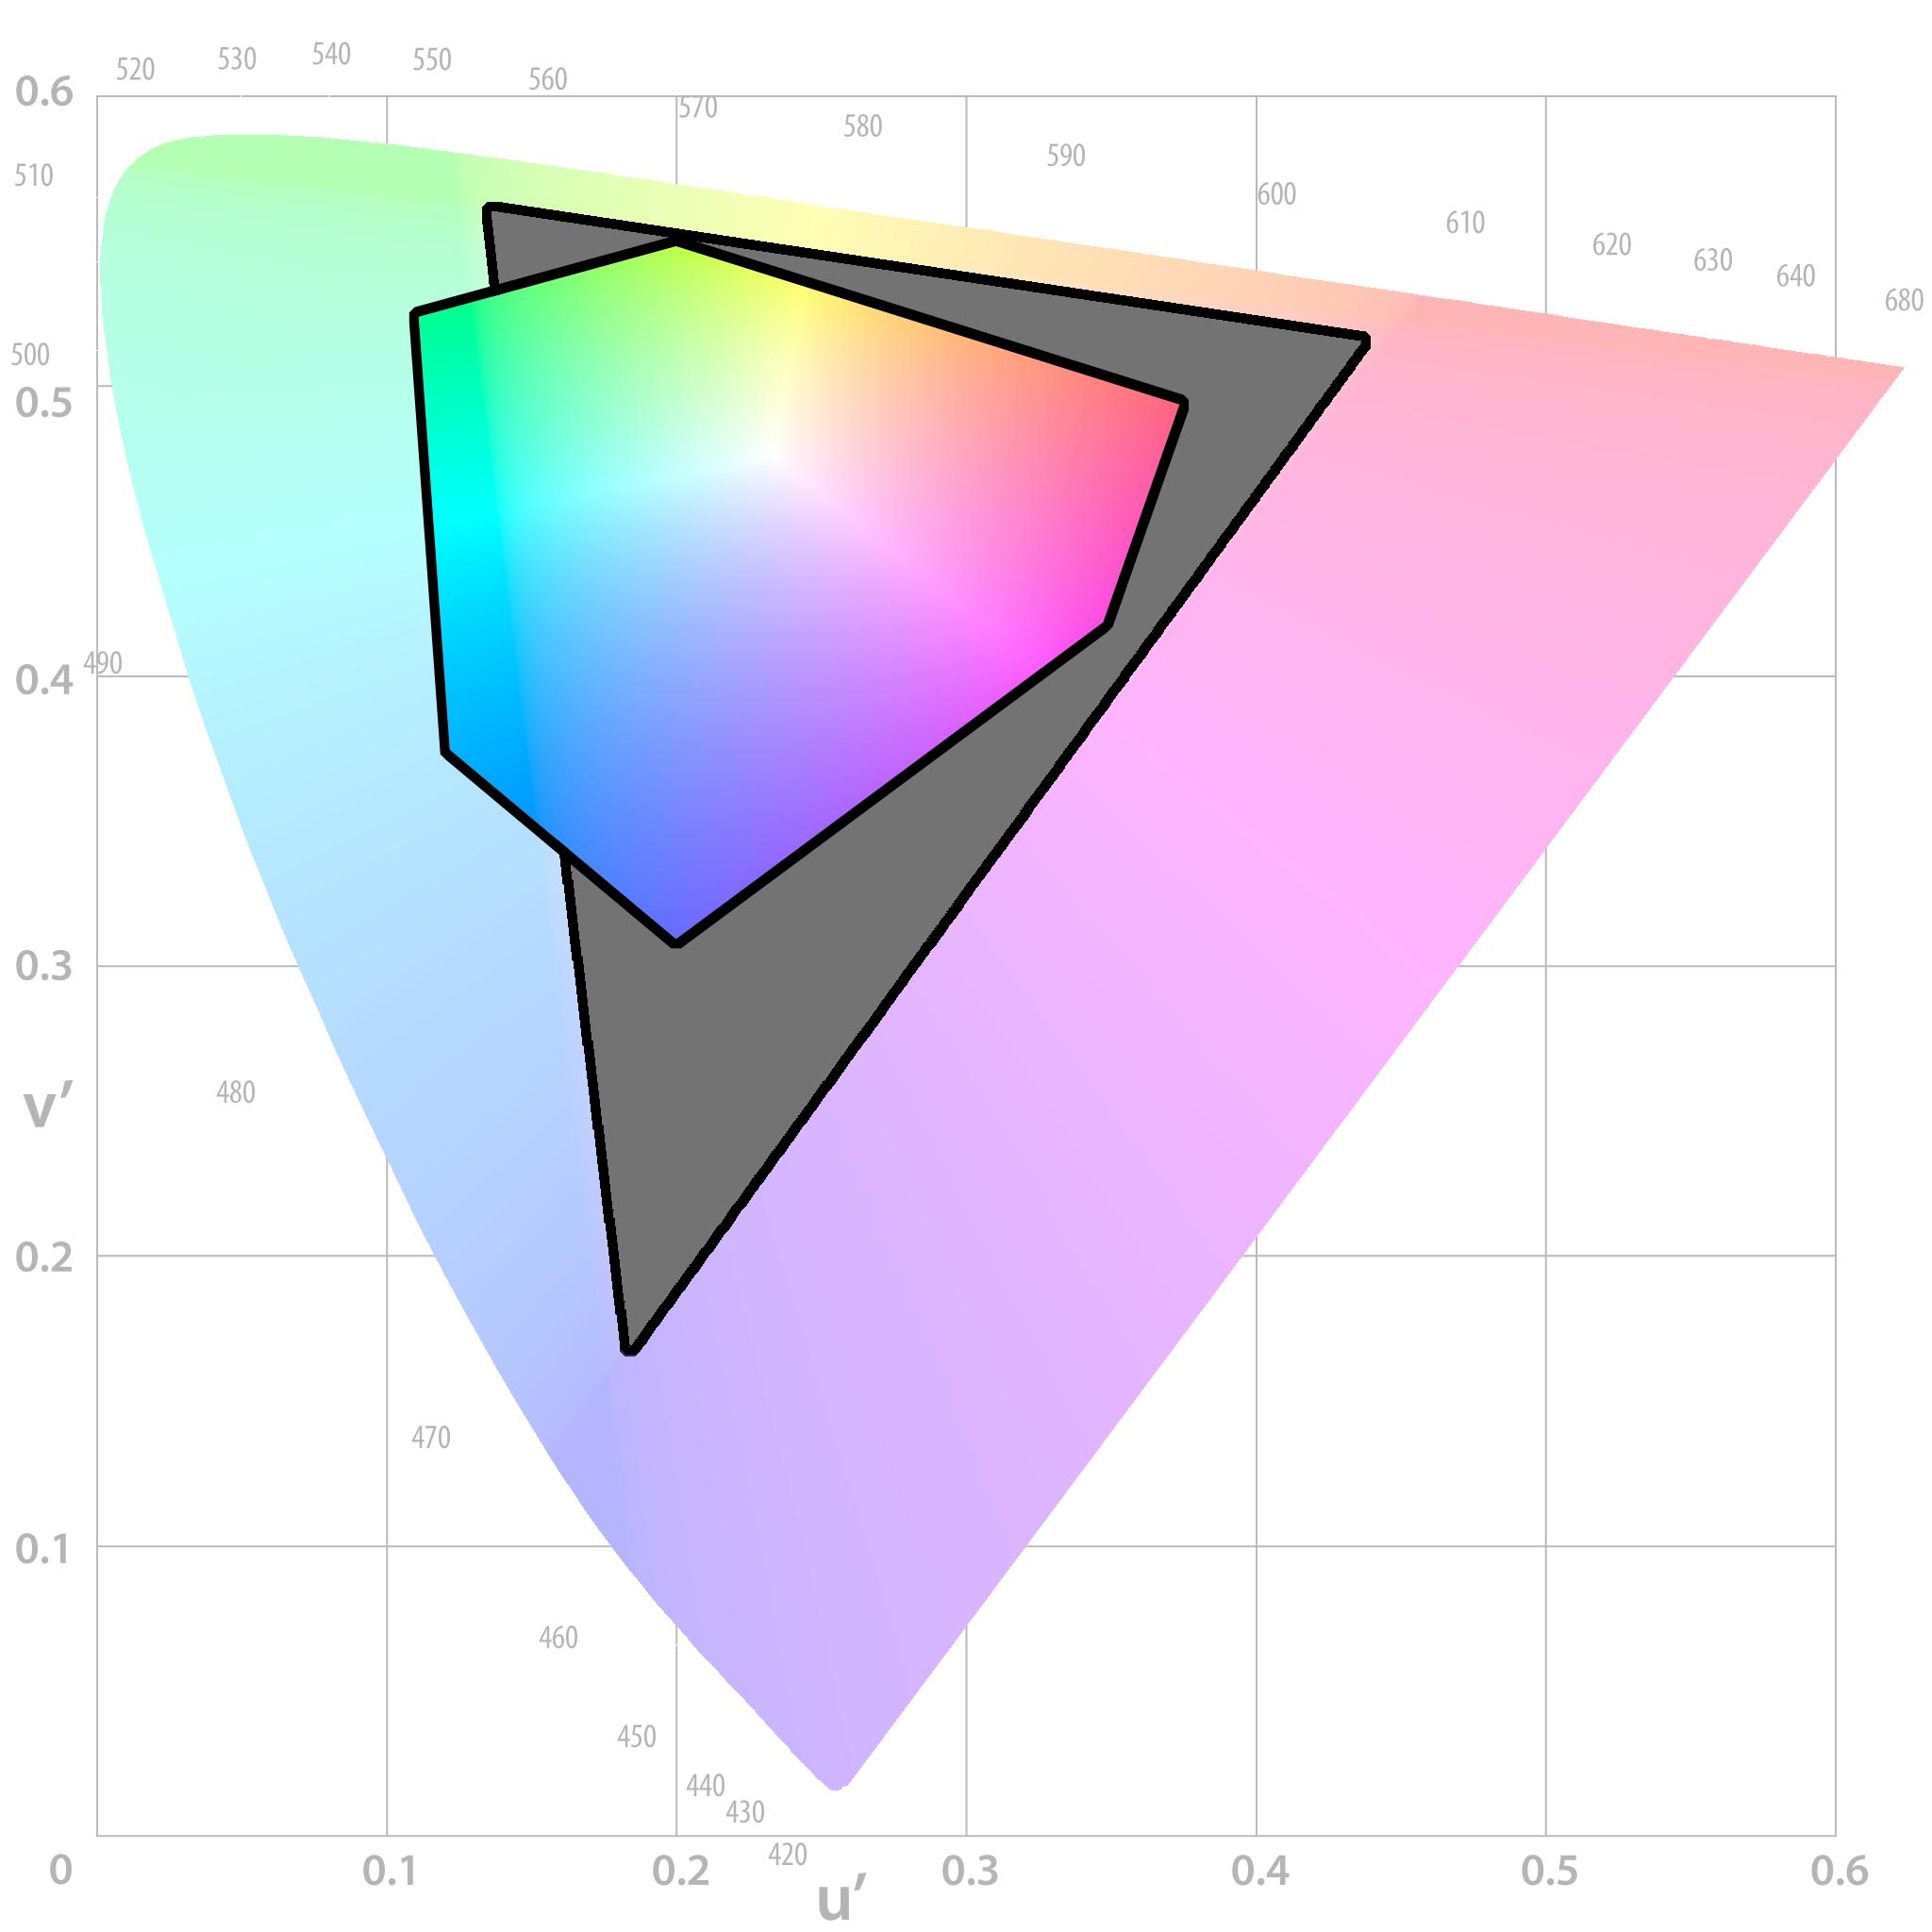

Out of Gamut

Perceptual Rendering


Perceptual rendering will squash the colours in an image until they all fall within the printable range. This means that if you have a steady gradient in your original image (such as the below), then the end result will be a steady gradient. Perceptual rendering intent is best for avoiding flat spots in a printed image, and preserving the overall "feel" of the design, whilst sacrificing accuracy somewhat.
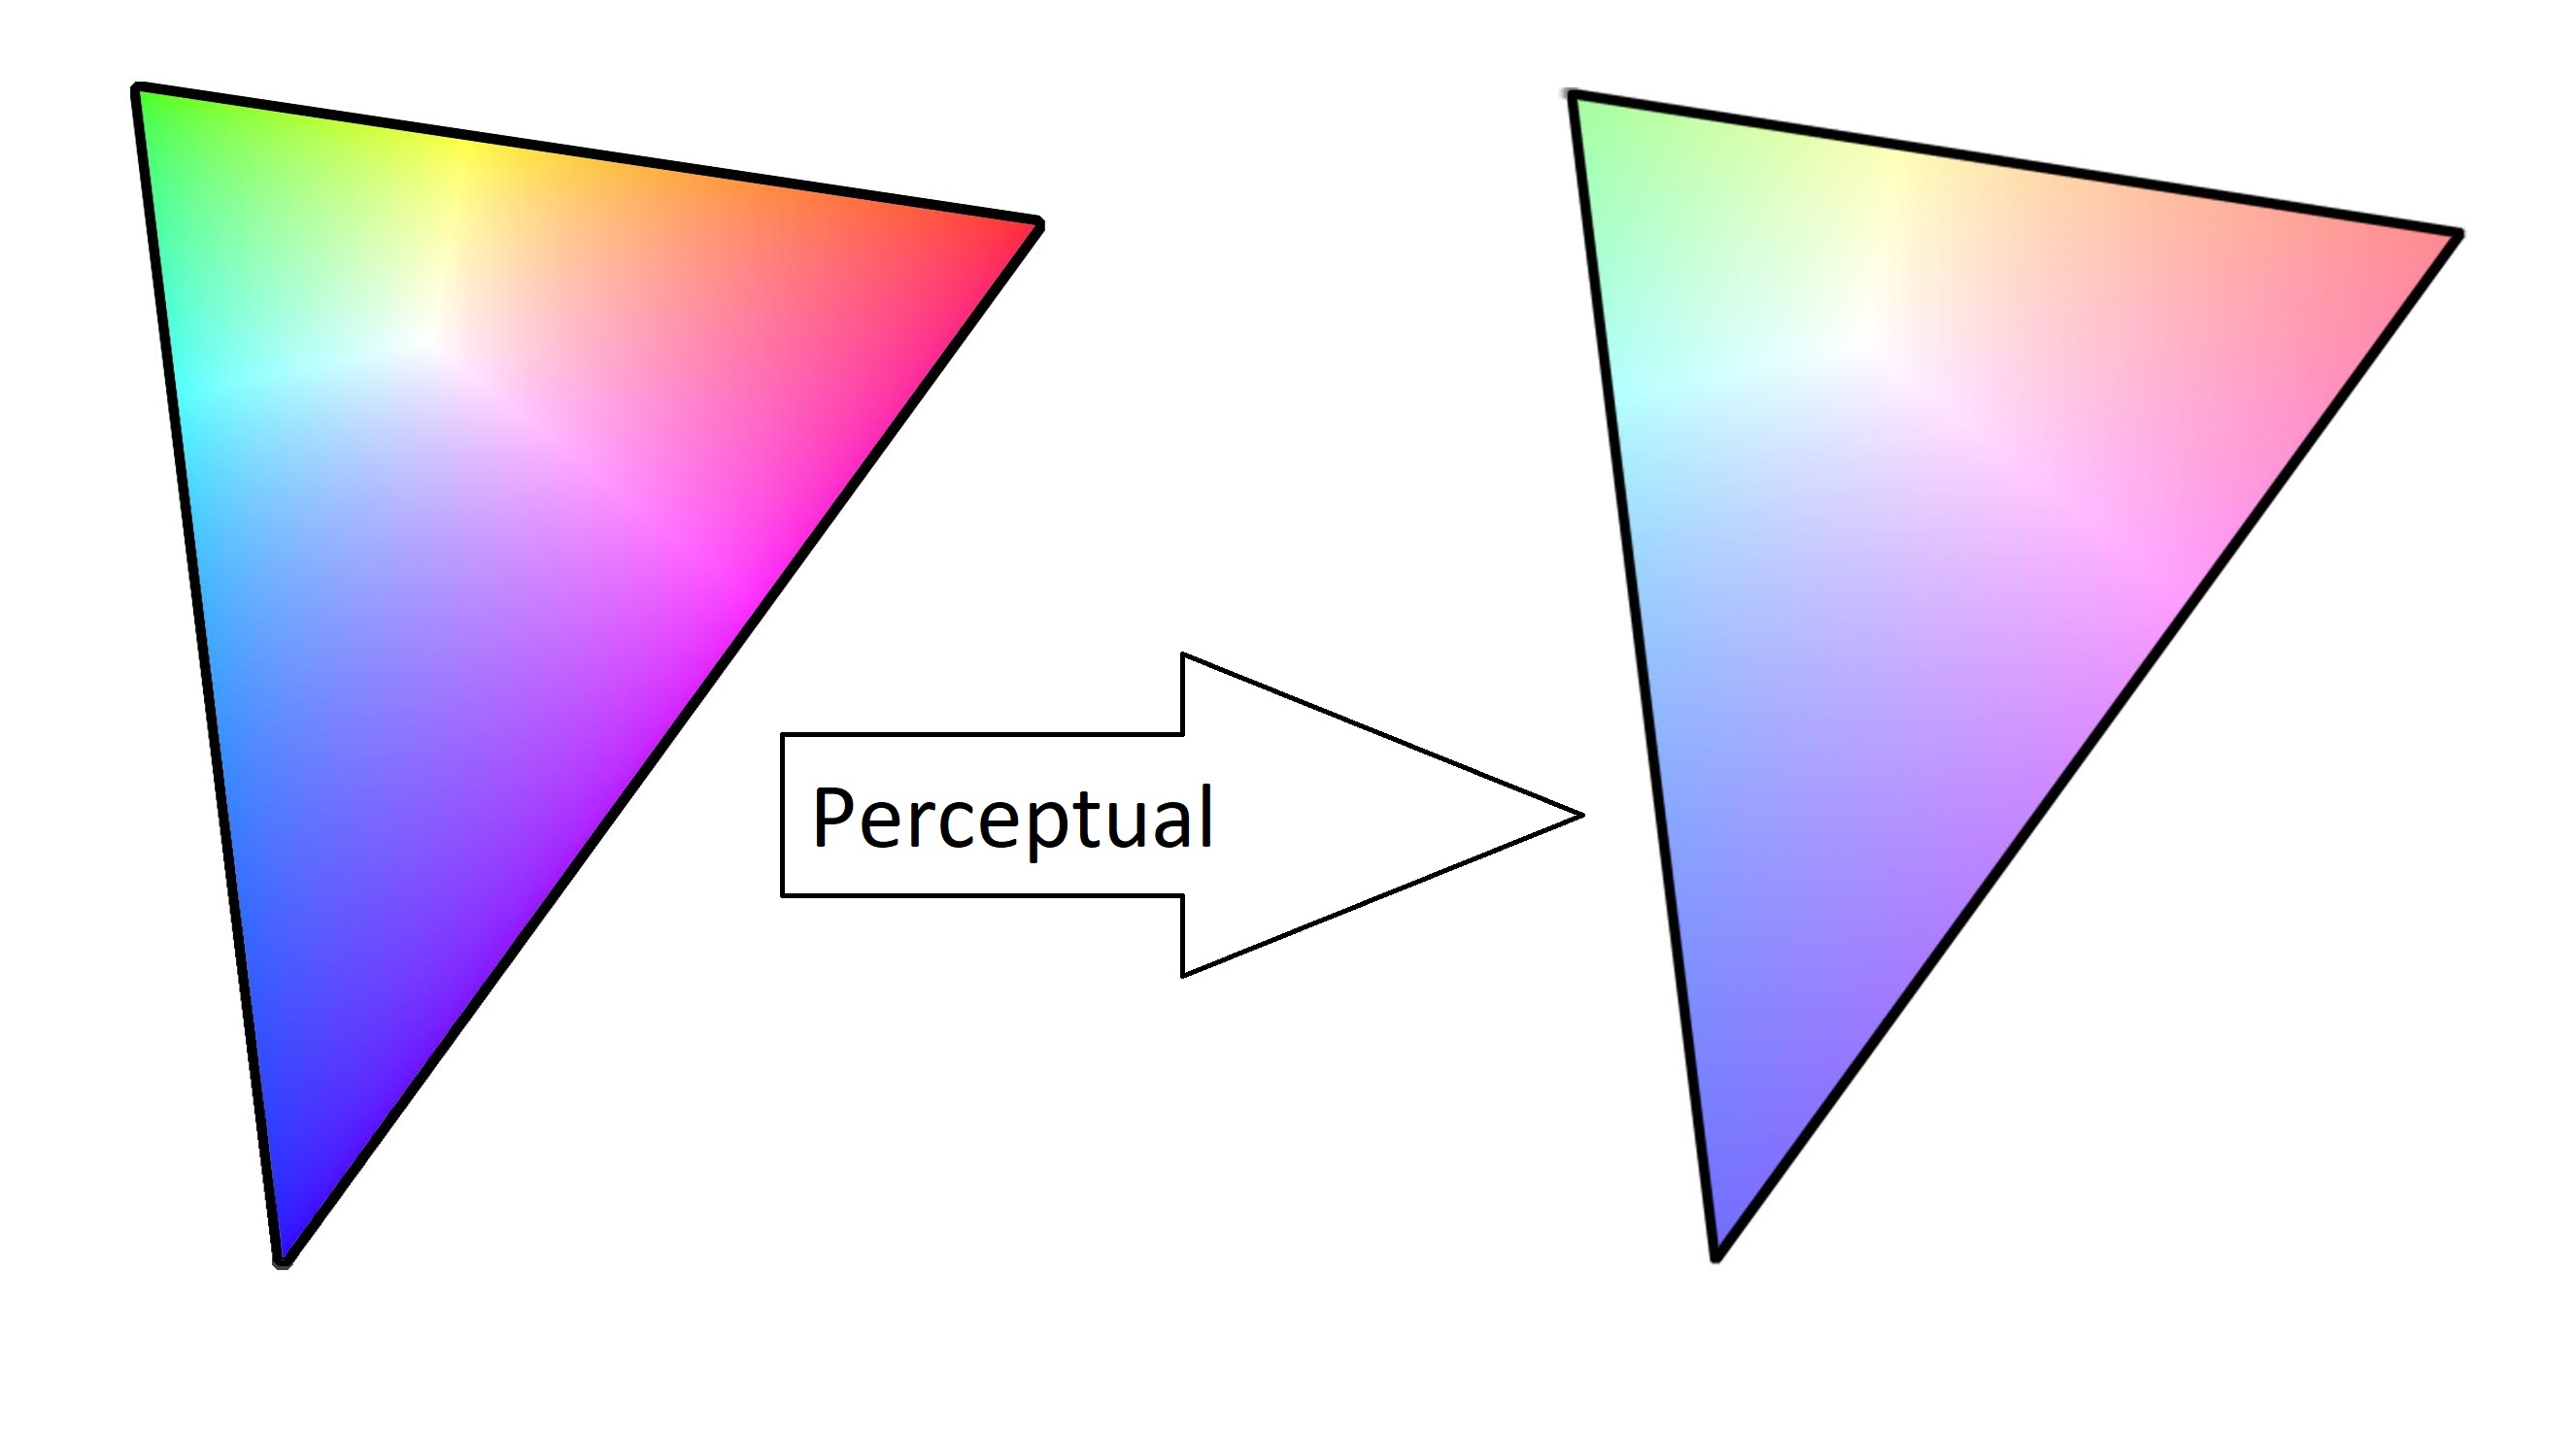

Perceptual Rendering

Relative Colorimetric Rendering


Relative colorimetric rendering tries its very best to preserve the original colours in an image, but for any unprintable colours the computer will just give up and pick the closest colour it can find. This will give the best results for things like skin tones, which needed to be matched exactly, but can leave you with flat spots in out-of-gamut (unprintable) areas.
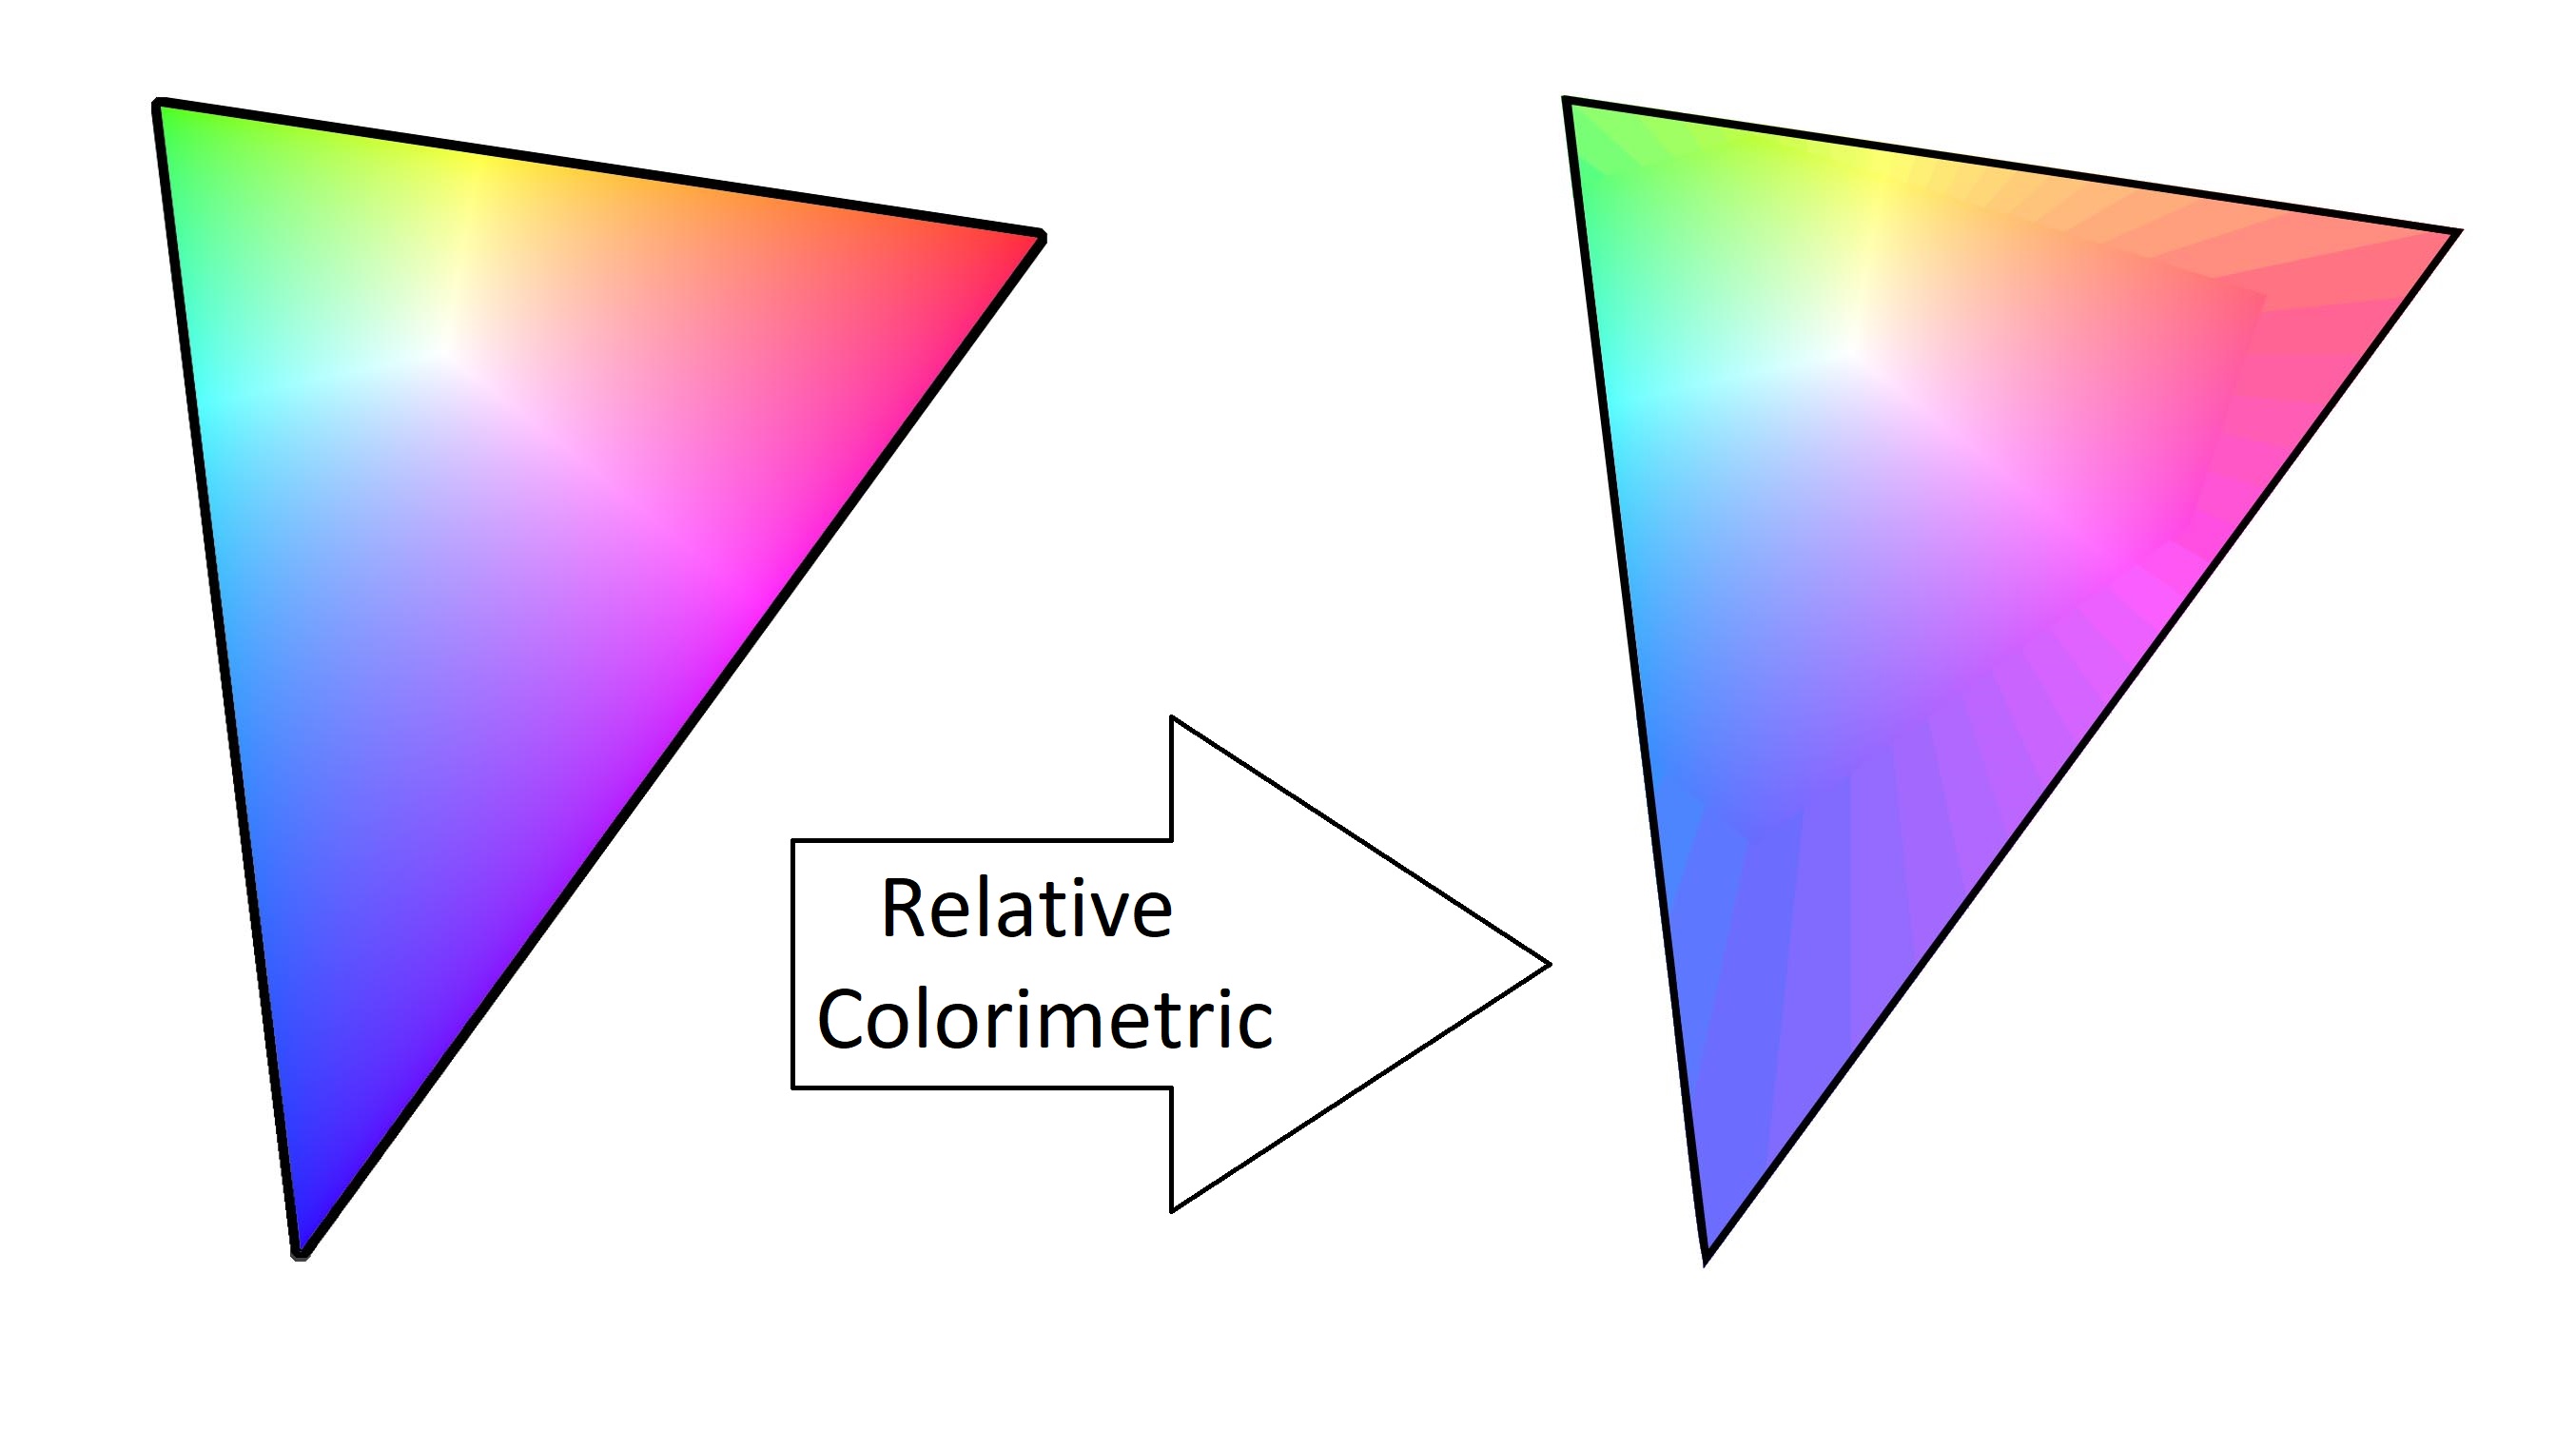

Relative Colorimetric Rendering

Absolute Colorimetric Rendering


For sublimation printing, absolute colorimetric rendering is absolutely awful. This rendering intent is usually used for "hard proofing" images, or printing them from one printer to try and see how they'd look on a different printer. This is only really useful if you're contracting out the printing of your images to another company, who happen to have a very large printer which has a smaller gamut than your printer, and who also aren't willing to do a test run to show you how the products will turn out.


So, absolute colorimetric asks your printer to do its best impression of a different printer, using different paper. This produces such lovely effects as your printer trying to colour in all of your paper to make it look like another paper, which is supremely useless for sublimation printing (you'd end up with a big coloured square on your finished products).
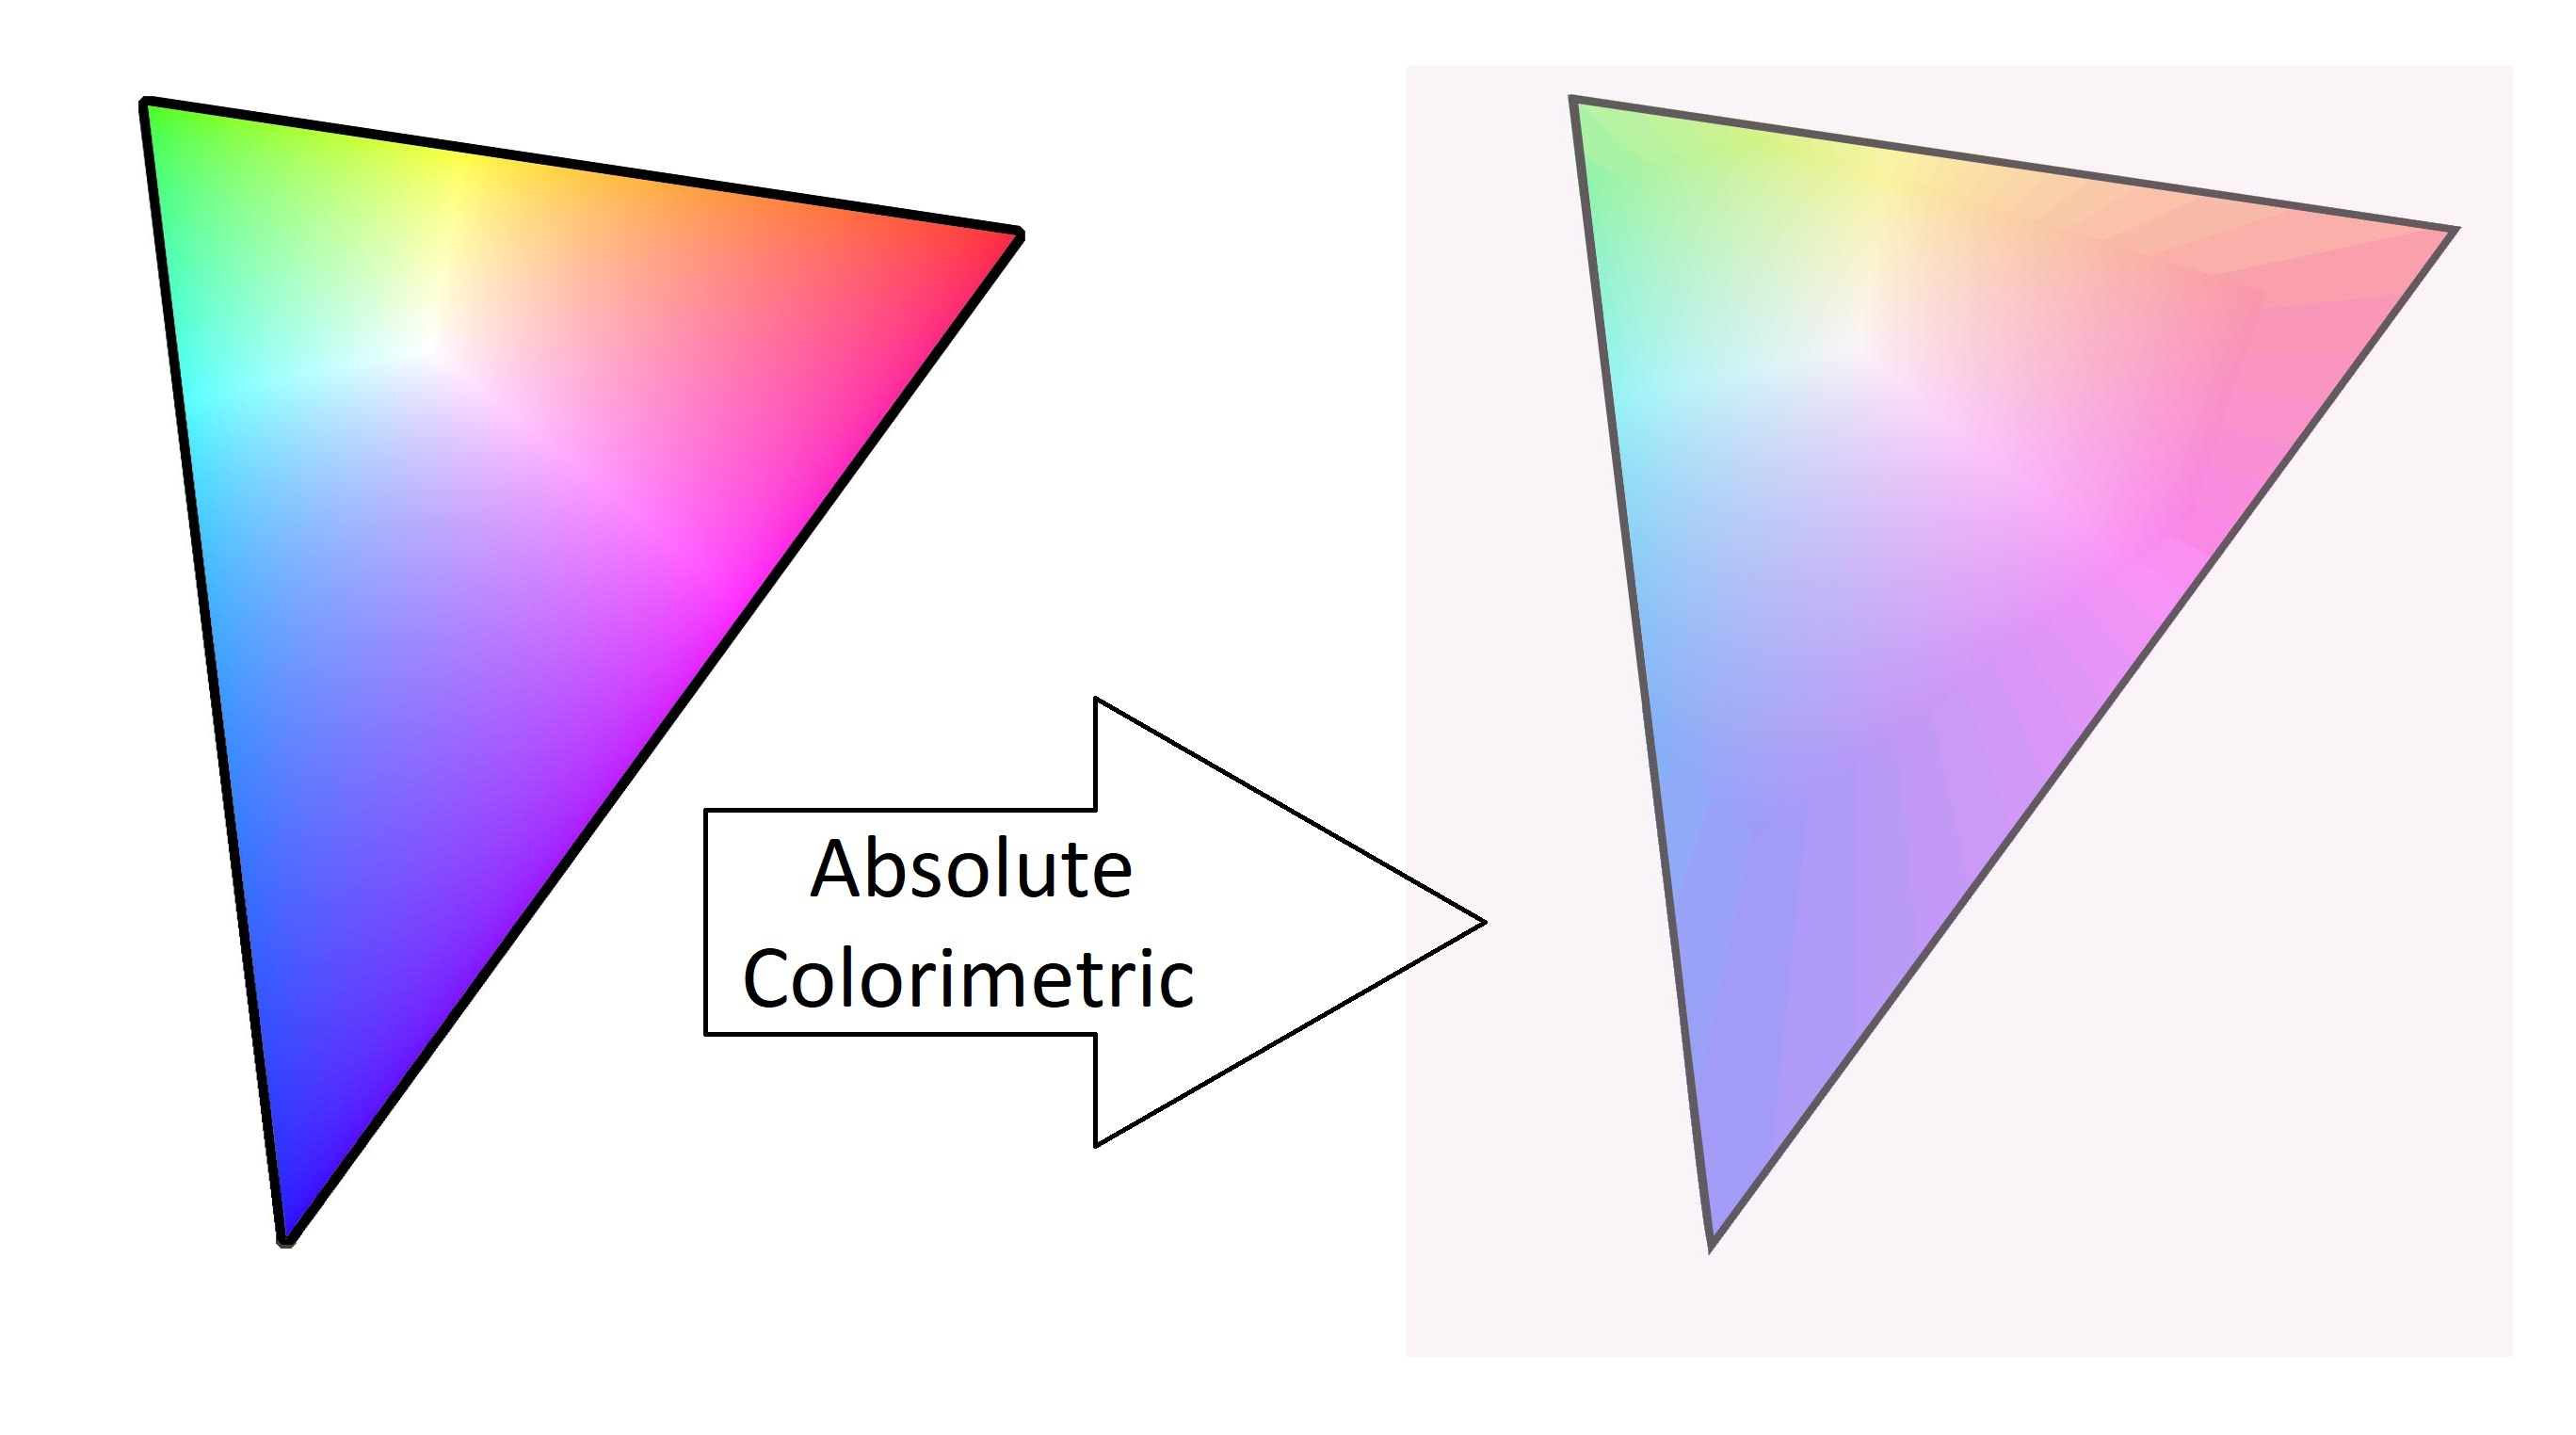

Absolute Colorimetric Rendering

Saturation Rendering


Similarly, do not use saturation rendering for your sublimation images, you'll end up with some terrible results. In the spirit of this post, though, we'll go ahead and explain it anyway. Saturation, as the name might imply, will try to preserve the saturation (or "boldness") of colours. This works well for things like graphs and charts, where you don't care so much about the actual colours displayed, as long as they're nice and bright.


This is quite difficult to show visually. The best I could do is shown below - saturation rendering will take a colour from the screen (dotted lines) and change it to the nearest colour with the same saturation (same coloured line) in the printer profile (solid lines). If it doesn't make sense, don't worry, as you shouldn't be using this mode anyway.
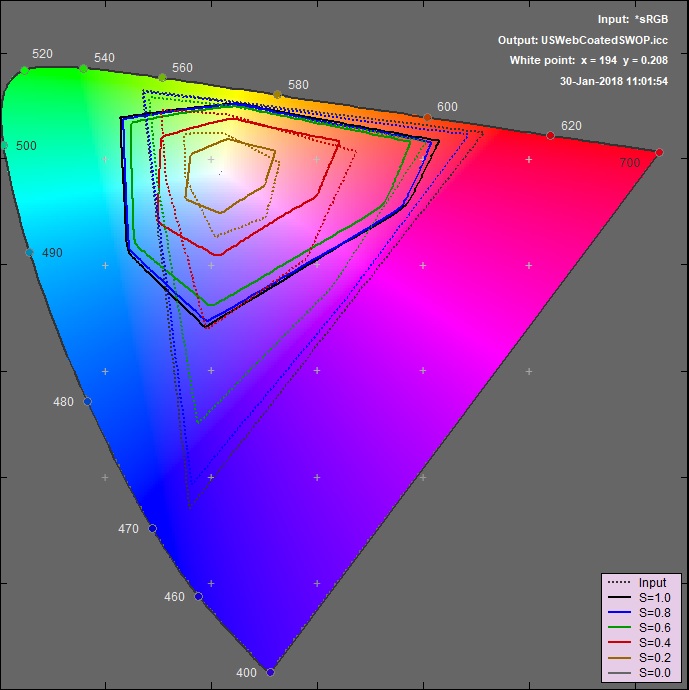

Saturation Rendering

So in summary, you can use either perceptual, or relative colorimetric, rendering intent. Either will be fine for the majority of cases, but if you're trying to print colours which your printer can't accurately reproduce, maybe try the other one as well.

This is the first in a series of posts looking at the entire process of sublimation printing, and how to choose products which work well together and help you to achieve the best results possible.


When people ask us which sublimation paper is best to use with our inks, we always feel a little disingenuous recommending our own paper. Obviously we would say that, wouldn't we?


When we settled on our sublimation ink, we tested a lot of different papers in order to see which would work best, and to save our customers some legwork in testing out the different options themselves. We know that our sublimation customers are concerned with the quality of their products above all else, and were determined to find the absolute best paper to recommend - after all, it doesn't matter how cheap your mugs are if they look cheap.


In order to demonstrate how our paper fares against the opposition, we decided on a simple test. We bought a pack of sublimation paper from ten of the main suppliers in the UK, printed the same image onto each, and sublimated them.


With sublimation paper, there are two main aspects which you should pay attention to. These are how the paper absorbs the ink, and how it releases the ink onto your substrate. Sublimation papers can all look very similar, and work based on the principle of a polymer management layer and release agent, but the recipe can vary substantially from one brand to another - it's important to find the paper which works best for your setup.


If your sublimation paper isn't capable of absorbing the ink quickly enough, your images can bleed and appear fuzzy around the edges. This bleeding will transfer across to the finished product, and can leave you with mugs and t-shirts looking sub-par. I'm pleased to say that only one of the papers in our test had this problem, and it wasn't ours. Most sublimation papers on the market today are what's known as fast-drying papers, so will readily absorb the ink during printing.


You'll find far more variety when it comes to releasing the inks. Ideally, you would have close to 100% of the ink transfer from your sublimation paper onto the finished product. Having more ink transfer means that your blacks will be richer, your colours more vibrant, and you will achieve much better results overall, allowing your images to really stand out. It also makes colour-matching easier, as you don't have to worry about your images looking washed-out or faded.


So, with that out of the way, lets look at the results of our tests. We included papers from all of the major suppliers, to try and find a definitive answer to which papers work best with our inks. The printer used for this is the Epson 1500w six-colour A3 printer, and you might also spot a couple of Ricoh sublimation printers in the background - we'll be discussing printers in greater detail in another post.


The first step was to print out our image onto each of the papers. It's best to leave sublimation paper to dry for a few minutes so the ink can finish being absorbed before it's handled too much, so we ended up decorating most of the office with these sheets - the image we chose was a sheet of around 1,000 colour patches, for the greatest variation in colours tested.


The images have now been printed, and are ready for sublimation - as you can see, there's very little variation at this stage of the process - all of the images were printed from the same printer, using the same settings.


We sublimated onto white aluminium sheets, one of the easiest substrates to work with. Ours are from Subli Metals Ltd, who provide a huge variety of sizes and finishes. At this point, all of the images have been sublimated for 50 seconds at 180°C and we haven't seen the results - our paper is in the top left of this image.


The big reveal - from looking at the sheets of paper, you can see there is quite a lot of ink left on each of the papers, except for one. I wonder which paper it is...


Enhance! Here's a closer picture of our paper compared to one of the others - you can see that a lot more ink has transferred across to the metal sheet with ours, giving much more vibrant colours - this will enable you to achieve the greatest possible variation in colours on your products.


Enhance! Another, closer look at the sublimated products - the image on the right appears faded, and almost cloudy in places, because of the incomplete transfer of ink. We probably don't need to point this out again, but the one on the left was using our paper. An issue like this may not seem like much on an aluminium sheet, but is far too noticeable on photographic products such as mugs, or on t-shirts (which have a lot more material to dye).


Having access to the largest possible colour gamut means you can consistently produce superb products for your clients, and we feel that our paper offers end results which outclass the opposition in terms of both ink fastness and ink transfer.


You can find the high-resolution version of the last three pictures here: